Ubuntu 18.04 LXD/LXC, ZFS, Docker, and Advanced Networking
This is a complete, step by step tutorial on configuring the following:
- Ubuntu 18.04 install on a server with two NICs
- One NIC for host traffic
- Other NIC for LXC/Docker traffic
- Plex, Sonarr, Radarr, Jackett in Docker on host
- rTorrent, ruTorrent, Flood, and OpenVPN nested in Docker in LXC container on host
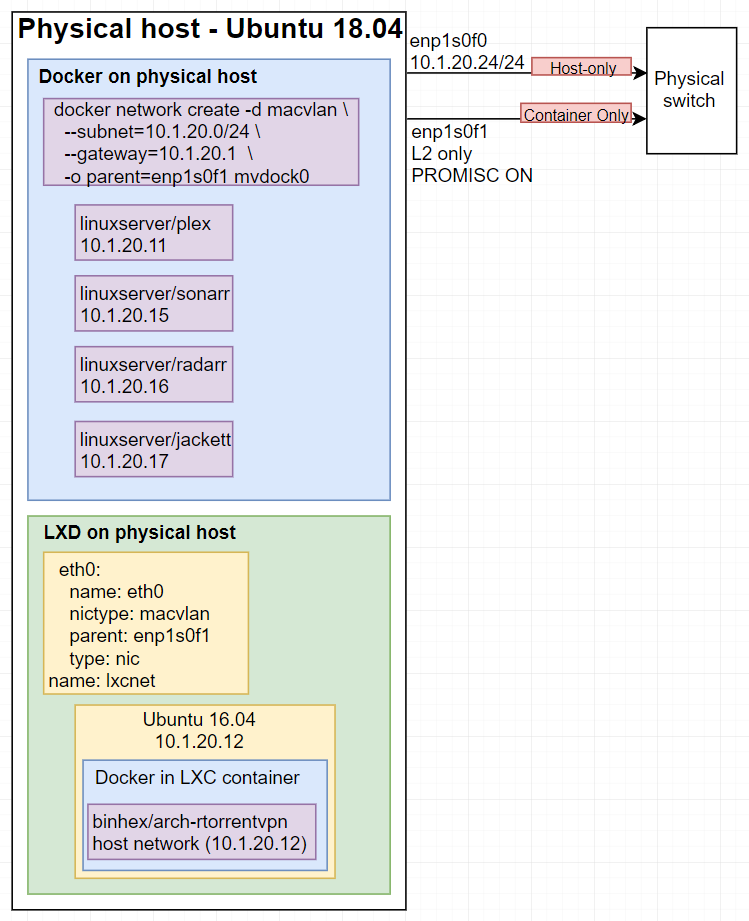
Topology from a visual perspective:
Topology from a CLI perspective:
will@ara:~$ docker ps
CONTAINER ID        IMAGE                 COMMAND             CREATED             STATUS                  PORTS               NAMES
3bccf3d47433        linuxserver/radarr    "/init"             5 hours ago         Up 5 hours                                  radarr
cecc3e98ae8e        linuxserver/sonarr    "/init"             5 hours ago         Up 5 hours                                  sonarr
4137c943105c        linuxserver/jackett   "/init"             18 hours ago        Up 18 hours                                 jackett
e5011d300ead        plexinc/pms-docker    "/init"             29 hours ago        Up 29 hours (healthy)                       plex
will@ara:~$ lxc list
+---------+---------+----------------------+------+------------+-----------+
|  NAME   |  STATE  |         IPV4         | IPV6 |    TYPE    | SNAPSHOTS |
+---------+---------+----------------------+------+------------+-----------+
| torrent | RUNNING | 172.17.0.1 (docker0) |      | PERSISTENT | 0         |
|         |         | 10.1.20.12 (eth0)    |      |            |           |
+---------+---------+----------------------+------+------------+-----------+
will@ara:~$ lxc exec torrent bash
root@torrent:~# docker ps
CONTAINER ID        IMAGE                     COMMAND                  CREATED             STATUS              PORTS                                                                                                                            NAMES
71af0f693c10        binhex/arch-rtorrentvpn   "/usr/bin/tini -- /b…"   19 hours ago        Up 19 hours         0.0.0.0:3000->3000/tcp, 0.0.0.0:8118->8118/tcp, 0.0.0.0:9080->9080/tcp, 5000/tcp, 49160/tcp, 0.0.0.0:9443->9443/tcp, 49170/tcp   torrent
Install Ubuntu
At Filesystem Setup for 120GB SSD:
-
Leave bootloader partition alone
-
I gave 20GB to / partition
-
I gave 60GB to /home partition
-
I left the rest as free space so it can be used later in this guide for our ZFS pool
Create user, add to sudo group, switch to user
adduser will
usermod -aG sudo will
su will
Configure host network interface
Get names of network interfaces
ip a
enp1s0f0 is for my host network enp1s0f1 is for my container network
Edit the existing YAML file
sudo vim /etc/netplan/50-cloud-init.yaml
network:
  version: 2
  ethernets:
    enp1s0f0:
      addresses: [10.1.20.24/24]
      gateway4: 10.1.20.1
      nameservers:
        addresses:
        - 10.1.20.254
        - 10.1.20.253
        - 1.1.1.1
        search:
        - paw.blue
    enp1s0f1:
      dhcp4: false
# I don't think this bridge is necessary but I could be wrong
#  bridges:
#    br0:
#      interfaces: [enp1s0f1]
#      dhcp4: true
Apply changes
sudo netplan apply
Schedule script every boot to set the physical interface used for containers to be UP with PROMISC ON. This is necessary right now on Ubuntu 18.04 due to a bug documented here.
mkdir ~/scripts
echo "ip link set enp1s0f1 up && ip link set enp1s0f1 promisc on" > ~/scripts/enp1s0f1.sh
chmod +x ~/scripts/enp1s0f1.sh
The following command will write to crontab so that your script runs as root at boot.
This did not work with only the first sudo, so I threw a bunch of extra sudos in there to make it work. I don't know if they are all necessary.
sudo crontab -u root -l | { sudo cat; sudo echo "@reboot /home/will/scripts/enp1s0f1.sh"; } | sudo crontab -
Set unused interfaces down
I have extra physical interfaces that I'm not using right now, so I'm shutting them down.
sudo ip link set en131s0f0 down
sudo ip link set en131s0f1 down
Interface troubleshooting
You can do the following to remove an IP from an interface. For example, I accidentally assigned 10.1.20.24/24 to enp1s0f1 but I want that IP on enp1s0f0 instead:
sudo ip address del 10.1.20.24/24 dev enp1s0f1
You can do the following to restart an interface:
sudo ip link set enp1s0f1 down && sudo ip link set enp1s0f1 up
If you need to fix 127.0.0.53 being in resolv.conf (this happened to me):
sudo rm -f /etc/resolv.conf
Create your host upgrade script
vim ~/update.sh
#/bin/bash
time sudo apt update && sudo apt full-upgrade -y
Make update script executable:
chmod +x update.sh
Run script to update. You can run this whenever you want to update.
./update.sh
Install whatever common packages you use:
sudo apt install tree unrar ncdu -y
Install ZFS and import ZFS Pool from HBA controller
sudo apt install zfsutils-linux -y
zpool import tank
Import zpools at boot. Not necessary if you reference the disk by-id when doing initial import as discussed here.
sudo systemctl enable zfs-import-cache
Install and configure samba
This section is entirely optional. I like being able to access my entire media ZFS pool from Windows.
Install Samba as described here.
sudo apt install -y samba
sudo vim /etc/samba/smb.conf
[tank]
   comment = ZFS Pool
   path = /tank
   read only = no
   guest only = no
   guest ok = no
   share modes = yes
Turn SMB sharing on:
sudo zfs set sharesmb=on tank
Create Samba user and define password
sudo pdbedit -a will
Find out who owns the media folder
ls -l /tank/media
will@ara:~$ ls -l /tank/media
total 499
drwxrwx--- 335 1420 1420    372 May 18 00:56 movies
-rwxrwx---   1 1420 1420 283648 Sep 18  2017 plexpy.db
drwxrwx---   5 1420 1420     16 Jan 25 19:03 radarr
drwxrwx---   2 1420 1420      2 Feb 18 01:36 security
drwxrwx---   5 1420 1420     16 Jan 25 19:01 sonarr
drwxrwx---  55 1420 1420     57 May  7 13:15 tv
I don't care about UID 1420, but I do want to name the GID 1420 group "media"
sudo groupadd media
sudo groupmod -g 1420 media
Observe changes:
will@ara:~$ ls -l /tank/media
total 499
drwxrwx--- 335 1420 media    372 May 18 00:56 movies
-rwxrwx---   1 1420 media 283648 Sep 18  2017 plexpy.db
drwxrwx---   5 1420 media     16 Jan 25 19:03 radarr
drwxrwx---   2 1420 media      2 Feb 18 01:36 security
drwxrwx---   5 1420 media     16 Jan 25 19:01 sonarr
drwxrwx---  55 1420 media     57 May  7 13:15 tv
Add myself to the media group and restart Samba
sudo adduser will media
sudo systemctl restart smbd nmbd
Configure LXC profile to use macvlan
Run lxc without typing sudo every time:
sudo setfacl -m u:will:rwx ~/.config/lxc
Create and edit the YAML file:
lxc profile create lxcnet
lxc profile edit lxcnet
config:
  environment.TZ: "America/Chicago"
  description: Creates macvlan bridge for LXC containers
  devices:
    eth0:
      name: eth0
      nictype: macvlan
      parent: enp1s0f1
      type: nic
  name: lxcnet
  used_by: []
Create ZFS partition on local SSD
Find disk/partition to be used
sudo fdisk -l
Check lxc version. On 18.04 it's 3.0.0 right now.
lxc info
Start configuration of LXC
sudo lxd init
will@ara:~$ sudo lxd init
Would you like to use LXD clustering? (yes/no) [default=no]:
Do you want to configure a new storage pool? (yes/no) [default=yes]:
Name of the new storage pool [default=default]: lxd
Name of the storage backend to use (btrfs, dir, lvm, zfs) [default=zfs]:
Create a new ZFS pool? (yes/no) [default=yes]:
Would you like to use an existing block device? (yes/no) [default=no]: yes
Path to the existing block device: /dev/sdg4
Would you like to connect to a MAAS server? (yes/no) [default=no]:
Would you like to create a new network bridge? (yes/no) [default=yes]: no
Would you like to configure LXD to use an existing bridge or host interface? (yes/no) [default=no]: yes
Name of the existing bridge or host interface: enp1s0f1
Is this interface connected to your MAAS server? (yes/no) [default=yes]:
MAAS IPv4 subnet name for this interface (empty for no subnet):
MAAS IPv6 subnet name for this interface (empty for no subnet):
Would you like LXD to be available over the network? (yes/no) [default=no]:
Would you like stale cached images to be updated automatically? (yes/no) [default=yes]
Would you like a YAML "lxd init" preseed to be printed? (yes/no) [default=no]: yes

config: {}
cluster: null
networks: []
storage_pools:
- config:
    source: /dev/sdg4
  description: ""
  name: lxd
  driver: zfs
profiles:
- config: {}
  description: ""
  devices:
    eth0:
      name: eth0
      nictype: macvlan
      parent: enp1s0f1
      type: nic
    root:
      path: /
      pool: lxd
      type: disk
  name: default
The outcome of these steps is that the network configuration from the lxcnet profile is copied to the default profile, and the default profile is populated with the ZFS pool information.
You can see this with the following:
lxc profile show default
will@ara:~$ lxc profile show default
config: {}
description: ""
devices:
  eth0:
    name: eth0
    nictype: macvlan
    parent: enp1s0f1
    type: nic
  root:
    path: /
    pool: lxd
    type: disk
name: default
used_by: []
Increase file and inode limits
sudo vim /etc/sysctl.conf
fs.inotify.max_queued_events = 1048576
fs.inotify.max_user_instances = 1048576
fs.inotify.max_user_watches = 1048576
sudo vim /etc/security/limits.conf
* soft nofile 100000
* hard nofile 100000
Now reboot:
sudo reboot
Verify host network, LXD network, and ZFS
Observe your primary network interface matches what you set in /etc/netplan/00-netcfg.yaml
ip a
Note that a pool has been created with datasets:
sudo zfs list
Create an LXC container for torrent/vpn
Note, this is an empty Ubuntu 16.04 container. I'm naming it 'torrent'
lxc launch ubuntu:xenial torrent
See that the container has started:
lxc list
Look for the MAC address in the container:
lxc config show --expanded torrent
In my case, I see the following:
volatile.eth0.hwaddr: 00:16:3e:e1:65:36
On my DHCP server, I create a new MAC reservation:
Name: torrent
IP: 10.1.20.12
MAC: 00:16:3e:e1:65:36
Enter the torrent container:
lxc exec torrent bash
Remove the dynamic IP so you can get the static one assigned
ip addr flush dev eth0
rm /var/lib/dhcp/dhclient.eth0.leases
dhclient -r; dhclient
You should see the DHCP-assigned static IP address:
ip a
Now exit the container
exit
Mount host directory into LXC container
Stop it if it's running:
lxc stop torrent
Make it privileged to avoid file ownership issues as noted here:
lxc config set torrent security.privileged true
Mount /tank/downloads to /downloads:
lxc config device add torrent downloads disk source=/tank/downloads path=/downloads
Allow Docker inside LXD container:
lxc config set torrent security.nesting true
Create non-root user and assign privileges
Start the container and enter it:
lxc start torrent
lxc exec torrent bash
Create user in the container and assign permissions:
adduser will
usermod -aG sudo will
groupadd media
adduser will media
usermod -u 1420 will
groupmod -g 1420 media
Log into user and create command so you can run sudo as documented here:
su will
vim ~/.bashrc
alias sudo='sudo -S'
Install the .bashrc:
source ~/.bashrc
Install docker in LXC container
Instructions pulled from here.
curl -fsSL https://download.docker.com/linux/ubuntu/gpg | sudo apt-key add -
sudo add-apt-repository "deb [arch=amd64] https://download.docker.com/linux/ubuntu $(lsb_release -cs) stable"
sudo apt update
sudo apt-get install -y docker-ce
Start it and enable it to start at boot:
sudo systemctl start docker
sudo systemctl enable docker
Let user do docker things without typing sudo:
sudo gpasswd -a will docker
sudo service docker restart
sudo systemctl enable docker
Leave and come back:
exit
su will
Install PIA VPN and torrent docker in LXC
Enter container if you aren't already in it:
lxc exec torrent bash
Prepare host (LXC container) and create torrent config directory:
mkdir -p ~/torrent/config/openvpn
mkdir ~/torrent/openvpn_all
cd ~/torrent/openvpn_all
wget https://www.privateinternetaccess.com/openvpn/openvpn.zip
sudo apt install unzip
unzip openvpn.zip
Copy only the key, cert, and ovpn file you want to use:
cp *.crt ~/torrent/config/openvpn
cp *.pem ~/torrent/config/openvpn
cp US\ Midwest.ovpn ~/torrent/config/openvpn
Create and run torrent docker:
docker run -d \
    --cap-add=NET_ADMIN \
    -p 9080:9080 \
    -p 9443:9443 \
    -p 8118:8118 \
    -p 3000:3000 \
    --name=torrent \
    -v /home/will/torrent/config:/config \
    -v /downloads:/downloads \
    -v /etc/localtime:/etc/localtime:ro \
    -e VPN_ENABLED=yes \
    -e VPN_USER=yourusername \
    -e VPN_PASS=yourpassword \
    -e VPN_PROV=pia \
    -e STRICT_PORT_FORWARD=no \
    -e ENABLE_PRIVOXY=no \
    -e ENABLE_FLOOD=both \
    -e ENABLE_AUTODL_IRSSI=yes \
    -e LAN_NETWORK=10.1.20.0/24 \
    -e NAME_SERVERS=10.1.20.254,10.1.20.253,208.67.222.222,1.1.1.1 \
    -e DEBUG=true \
    -e PHP_TZ=America/Chicago \
    -e UMASK=000 \
    -e PUID=1420 \
    -e PGID=1420 \
    --restart=always \
    binhex/arch-rtorrentvpn
If you need to add a flag on the fly to a running container, here's an example:
docker update --restart=always torrent
Enter a Docker container for troubleshooting:
docker exec -it torrent /bin/bash
Install and set up Docker on host
Install Docker in Ubuntu 18.04:
curl -fsSL test.docker.com | sh
Create macvlan for hosts
docker network create -d macvlan \
--subnet=10.1.20.0/24 \
--gateway=10.1.20.1  \
-o parent=enp1s0f1 mvdock0
Create and run Plex container:
docker run -id \
--name plex \
--network=mvdock0 \
--ip=10.1.20.11 \
-h plex \
-e VERSION=latest \
-e TZ="America/Chicago" \
-e ADVERTISE_IP="http://plex.paw.blue:32400/" \
-e PLEX_UID=1420 -e PLEX_GID=1420 \
-v /tank/plexdata/config:/config \
-v /tank/media/tv:/tv \
-v /tank/media/movies:/movies \
-v /tank/media/education:/education \
-v /tank/transcode:/transcode \
plexinc/pms-docker
Sonarr:
docker run -d \
--name sonarr \
--network=mvdock0 \
--ip=10.1.20.15 \
-p 8989:8989 \
-e NAME_SERVERS=10.1.20.254,10.1.20.253,208.67.222.222,1.1.1.1 \
-e PUID=1420 -e PGID=1420 \
-e TZ=America/Chicago \
-e DEBUG=false \
-v /etc/localtime:/etc/localtime:ro \
-v /home/will/sonarr/config:/config \
-v /tank/downloads:/downloads \
-v /tank/media/tv:/tv \
--restart=always \
linuxserver/sonarr
Radarr:
docker run -d \
--name=radarr \
--network=mvdock0 \
--ip=10.1.20.16 \
-p 7878:7878 \
-e NAME_SERVERS=10.1.20.254,10.1.20.253,208.67.222.222,1.1.1.1 \
-e PGID=1420 -e PUID=1420 \
-e TZ=America/Chicago \
-v /etc/localtime:/etc/localtime:ro \
-v /home/will/radarr/config:/config \
-v /tank/downloads:/downloads \
-v /tank/media/movies:/movies \
--restart=always \
linuxserver/radarr
Jackett:
docker run -d \
--name=jackett \
--network=mvdock0 \
--ip=10.1.20.17 \
-p 9117:9117 \
-e NAME_SERVERS=10.1.20.254,10.1.20.253,208.67.222.222,1.1.1.1 \
-v /home/will/jackett/config:/config \
-v /tank/downloads:/downloads \
-e PGID=1420 -e PUID=1420 \
-e TZ=America/Chicago \
-v /etc/localtime:/etc/localtime:ro \
--restart=always \
linuxserver/jackett
Docker Experimental
If you want to use an ipvlan instead of a macvlan in Ubuntu 18.04, you will have to start docker in experimental mode.
Enabling experimental mode:
dockerd --experimental=true
Examples of layer 2 and layer 3 ipvlan networks:
docker network create -d ipvlan \
   --subnet=10.1.20.0/24 \
   -o ipvlan_mode=l3 \
   -o parent=enp1s0f1 ipdock0
docker network create -d ipvlan \
   --experimental=true \
   --subnet=10.1.20.0/24 \
   --gateway=10.1.20.1  \
   -o ipvlan_mode=l2 ipvlan20
FAQ
Q: Why don't you just run the vpn/torrent docker container on the host?
A: I tried to do that with the network=mvdock0 and ip flags, but it wasn't working. I think it has something to do with the way the VPN is influencing the network connection. By making the vpn/torrent docker container use the "host" network and having the "host" actually be an LXC container, I can still ensure this traffic passes through enp1s0f1 on the physical host.
Q: Why not do all LXC or all Docker? Why mix and match?
A: First, so I could learn both. Second, Docker is so easy to get my applications up and running. Third, my inspiration for this project was this amazing post by Jason Bayton, and I loved the idea of hosting LXC containers in ZFS. As it turns out, I only hosted one. But perhaps more soon!
Summary
This took me many hours to assemble, as I had very little LXC or Docker experience before setting out on this journey. I'm sure people will point out many, many flaws in this tutorial. Please comment so that I can fix them!
If this guide helped you, please consider a small crypto donation!
BTC: 3CvPzK2Sjcoi8A5Nkxuh6Djo6xX7udgYa9
LTC: MQBTp7k2c8ec43RAeAkNUu6E4i97dPGA8s
DGB: Sj9Qwky7p2J1pKLwvBNFhpLXk6ATswsDsP